"Give a girl the right shoes, and she can conquer the world."
-Marilyn Monroe
Showing posts with label eyes. Show all posts

Sunday, September 14, 2014

A Fine Line Between Fab Queen and Drag Queen.

Let's talk about eyeliner.
This week I'll be touching on all the different kinds of eyeliner out there, the pro's and con's of each liner and which gives what effect. If you want me to do a review I probably will, because believe me sugar, there's a ton to cover.
  Eyeliner is such a broad topic, it's one of those things that all eye shapes can pull off, but some are more compatible with certain types of liner than others. So I want to babble a little bit about a great, all-spectrum liner. The classic pencil. There are a billion different kinds of pencil eyeliner, from gel-infused pencils to khol, variety is something you'll never run out of. As far as eye shapes I would limit to this kind of liner, I'd say hooded eyes mostly, eyes that have become hooded with age, or eyes that have very little open lid space. A huge eyeliner no-no is letting our dramatic black eyeliner take over all the space on our lid and disappearing into our crease. It's called eyeliner, not eyemasker.
Pencil liner is a great option for anyone with little to no lid space because it often times is very blendable product, so it doesn't give us a harsh line that'll just vacation in our crease. So instead of weighing down the upper lid even more with a bulky line, we can choose a grey or brown shade and blend it out to give us definition, and a lifted, smokier eye. However there are pencils that will give you a great defined black line, if that's what you so desire, you'll just have to shop specifically for them. The great thing about pencils is that they're super easy to apply, so if you want a more dramatic look just get the right pencil and it's splendidly carefree to put on, for this however I suggest the Sephora line of pencils. They're wonderful.
The con's of pencil is only that it falls quite easily. When pencil eyeliner falls, it collects underneath our lower lid, creating dark rings around our eyes. Pencil can wear off with as little as light humidity, but the more high end pencils do a great job of countering this unwanted effect. Purchasing a waterproof product will also combat this annoying side-affect to a great degree. Yet another way to prevent falling is setting your eye makeup with a setting spray or even hair spray. Combining all these techniques will almost guarantee your liner staying all day.

Liquid eyeliner is a favorite for a lot of people for its long lasting wear and great color, butI'm sure I don't have to tell you, this particular nugget takes quite a bit of patients to apply. I used to be a huge fan of this type of product, but now I find, not so much. But that's a matter of personal preference. Liquid eyeliner is great for anyone who's had a little practice with lining their eyes, practice and patients is definitely  required. The potion is just so malleable, it's easy to get messy, but it's a great liner for anyone who's looking for something to stay on all day, and a cheaper alternative to gel liner that can be much more frustrating to apply, but we'll cover that in a second. The pros of liquid liner is that it lasts all day, and looks genuinely great when applied correctly, the only downside is all of the frustration of applying it.

Gel eyeliner, or sometimes refereed to as cream liner,my personal favorite. This liner is a go-to for a lot of makeup artists. Its color is always dramatic and way pigmented no matter what shade you purchase it in. Even if you don't get a waterproof product, this eyeliner will practically glue itself to your lid (not so annoyingly as to be a chore to remove, but without using makeup remover, this thing is staying the eff put). This is the eyeliner that's going to give you that awesomely matte, Marilyn Monroe winged look. Perfect for any sort of performer, or someone who's looking for a heavy-duty sweat proof product to last through any sort of stressful environment. You will however need to purchase a gel-liner brush to apply it with, such as a short angled brush, or a bent-liner brush. If you're confused about what item to purchase specifically, the ladies at Sephora can definitely help you out. However, this product is incredibly unforgiving. Make a mistake and you might have to do your eye makeup completely over again just to undo it, so I wouldn't recommend gel to anyone who is new to liner, just for that reason.

Cake eyeliner comes in a powder form. To use this type of eyeliner, you first need to dampen your brush. Cake liner is way easy do apply, I found it to be easier than liquid liner. Although because the solution becomes watered down from your brush, its color will be somewhat diluted, becoming ever so slightly more grey than before. this problem can be easily fixed by setting the liner with some dark black eyeshadow. Once you do that, it's incredibly fantastic looking. The color is so rich and deep, you could compare it to gel! However this product does infact fall, you can use setting spray but it never helped much for me. It doesn't fall worse than pencils though, which is totally a plus. Cake is the one of the quickest (besides pencils) products you could use, it's great for anyone looking to get it done.

Personally, I enjoy gel liner. It's long wear and dramatic look is perfect for stage work, which I do a bit of. It'll stay on no matter what you're doing, whether it's sitting in front of a computer blogging, or dancing Russian ballet. But personal biases aside, all of these liners are great choices for every kind of person and activity level. If you have any questions about the different types of liners, feel free to ask, I'll be happy to help with whatever I can.
Next week I'll be talking about which eyeliner looks work with what eye shape, what eyeliner I would suggest for you and more!
See you then!

As awlays,

           God Bless.


Saturday, August 30, 2014

Thou Shalt Not Whisk Your Eyelashes.


Last week we talked about some of the drugstore/high-end mascaras that (according to personal preference) yielded varying results, ones that I loved, and some that I hated. Today lets talk about caring for our mascara, how to apply it correctly, and keeping those ugly clumps away.

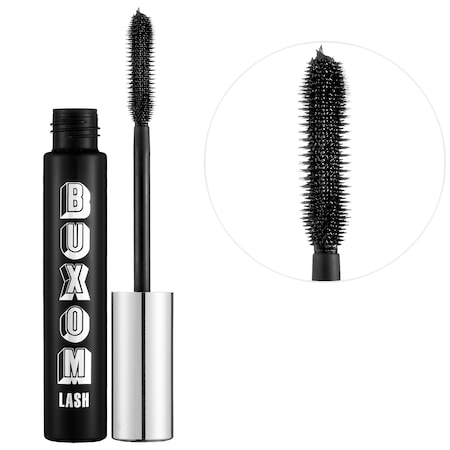
Firstly I'd like to talk about the product I'm using currently, I'd like you to take a good look at the wand and what the product looks like. As of right now I'm using my all time favorite mascara, the Buxom Lash. Lets take a look at the applicator. It's a rubberized brush, with long, well-separated bristles shaped in an hourglass figure. The hourglass shape is formed so that it's thicker on the end near the outer corner, and thicker towards the inner corner as well. Why? Because the thicker the brush, the more drama, so this applicator is going to bring big, pumped up diva-lashes strait to your little eye umbrellas. So why is it thicker towards the inner corner too? Isn't that just going to make our lashes look like they're doing the wave? No. Our lashes get thinner towards the inner corner, so this is actually going to give some continuity, keeping the drama going all the way into your friggen tear-duct. Also note what the actual mascara looks like. You can see that it's quite creamy, a very wet solution. it doesn't hug the bristles together, so this means that it's way less likely to clump. Here's a trick: whatever the wand looks like, for instance, if a wand has a lot of densely packed non-plastic bristles, with a thicker, more dry solution, this mascara aims for high drama, not focusing on length or separation, so most likely it'll clump if you don't apply it very carefully.

Now onto the tutorial section of this post.
This part is really important, because no matter how great of a product you find, if you apply it like you're trying to whisk the shit out of your eyelashes you're going to get goddamn clumps. So instead of pretending like your hand is a jackhammer and your lashes are  concrete, follow this quick guide to preventing clumps and making the most of your mascara!

Mascara rule #1: Curl your lashes. Now this is a pretty well-known rule, but it may not be as quick and easy as you think. When you're curling, you want to get as close to the roots of those babies as you can, do not pull the curler outwards, do not apply too much pressure. When we perform this step, we want to think of our lashes curling, not bending.
Mascara rule #2: Clean your wand. Before applying product to your lashes, you always want to make sure the tip of your wand is clean, as well as the rest of it. Some people deposit the excess product collected on the tip onto their hand, to later wash it off, others swipe the tip across the opening of the mascara tube. It doesn't really matter, just make sure it's clean. As for the rest of the brush, you can wipe it down on a makeup remover wipe, or a paper towel that won't leave behind any lint, just to make sure you don't have excess product on the applicator. Make sure you clean it every time you go for another coat, this prevents clumping, and keeps your mascara more fresh for longer.

Mascara rule #3: Apply it correctly. Often times when I watch others apply their mascara I see them making the biggest mistake they could possibly make, they apply it furiously. One swipe right after another with harsh wiggling, never giving the mascara time to set itself, as if they're trying to WHISK their eyelashes. You are always going to get clumps by using this technique. Stop. The most successful technique I've found (which is one my mother taught me not too long ago), is to use ONE pump of mascara for both eyes (get the wand as close to the roots of your lashes as possible), turn the wand SLOWLY, and either blink or pull the brush upwards. Wait about a minute, or two minutes, for your mascara to set, and repeat the application process, dipping the wand once for each coat. Don't apply too many coats, every mascara will clump and become bulky and flaky when you put 7 layers on, but a good mascara should be reasonably separated and dramatic at 4. Don't forget to clean your wand before placing it back in your tube after you're finished. If you see that your mascara has begun to dry out prematurely, try placing one or two drops of eyedrops (such as Visine) into the container and mix it in with your wand. Do not, however, pump your mascara to mix the drops in to it. This will push more air into your mascara and cause it to dry out faster, instead twirl your brush around, stir it a little, and you should be good!

And alternative way to apply mascara can be seen in this video here.
This technique will take you quite a bit more time to apply, but believe me it's worth it. Go check out this guy's channel, he is completely amazing! Truly a god of makeup art.
And I leave you with this! I hope this helped you with your makeup woes. Next week I'll do a fun, easy nail art tutorial just to take a break from the eye-related redundancy, which from there I'll start talking about makeup for your eye shape such as shadows, eyeliner, and more. I'll probably do one post for each eye shape, just to get more in depth so I don't leave anyone out!


Until next time,
     God bless.

Tuesday, August 26, 2014

Maybe She's Born With It, Maybe It's Not A Shitty Mascara.

Today I'm going to be reviewing a few of the drugstore mascaras that I've tried, giving reviews on my experience with them. Keep in mind this is my experience, and these mascaras could work differently for you depending on the type of lashes you have. You should also know my biases toward mascaras lean highly toward the quality of color and how well it separates. That's really what I look for in a mascara so naturally I'll give those products a better review.
I'll be reviewing three drugstore mascaras and one high-end mascara to show you the differences and what to look out for.
Let's go!


The first mascara I'd like to cover is Maybelline's The Rocket Volum' Express.

Pro's: Smooth application, I purchased the waterproof version of this mascara and it did resist the water very well.
Con's: Clumped badly, didn't volumize well, very flaky.

I purchased that mascara in a dark brown shade, 
just to accentuate my eyecolor. By the first application I already disliked it, It did not give my lashes any volume, instead I found it clumped no matter how hard I tried, or how little product I used. After about a month or two it had already dried out. Removing this mascara was a chore, I had to wait until I showered the next morning and use two different makeup removers to get it to come off. However this is a problem you face with almost every water-resistant mascara is that it...well... resists water.
 Overall stars out of 5:  *  


The next mascara I'd like to discuss is the Revlon Lash Potion Grow Luscious Volume and Length mascara.

Pro's: Beautiful dark brown color, applies quickly, provides fair volume.
                 Con's: Transfers onto your lid, takes a very long time to dry, clumping isn't a huge problem with this mascara however it's still an obstacle.

After purchasing the Rocket mascara I found the Revlon Lash Potion. I was quick to enjoy this mascara, it had a wonderful color, and didn't clump on the first coat. It didn't quite give me as much drama as I was hoping for, but it was still a good every-day mascara. I purchased this product in Blackened-Brown, coupled with a darker brown gel eyeliner it looked great. There isn't much more to say about this other than it's a good standby mascara when you need something quick and not-too-dramatic. Would I repurchase it? Probably not, it was just a bit run-of-the-mill for my taste.
Stars out of 5:  *  *  *


Let's talk about falsies now. We've all heard of these mascaras, some beauty gurus swear by them. I however, have had a different experience.
I've tried a lot of this brand of mascara, but I'm going to talk about The Falsies Winged mascara today.

Pro's: Rich dark black color, potion was not too thick or dry, lasted for months.
           Con's: Did not wing lashes as advertised, transfers badly, clumps, hard to apply.

This mascara was indeed high-drama, that can either be a good thing or a bad thing depending on how it was applied. It was a very picky mixture, and with the slightly confusing curved wand, it was an adventure to figure out how to use. Once you solve the puzzle however it's a fairly decent product. I was not too overly impressed as when you would apply over one coat it would become overly shiny, as if it was too oily. I don't think I'll be purchasing this again, but if you're feeling brave go ahead and try it for yourself and tell me how it worked for you!


Stars out of 5:  *  *


Now for our high-end mascara.
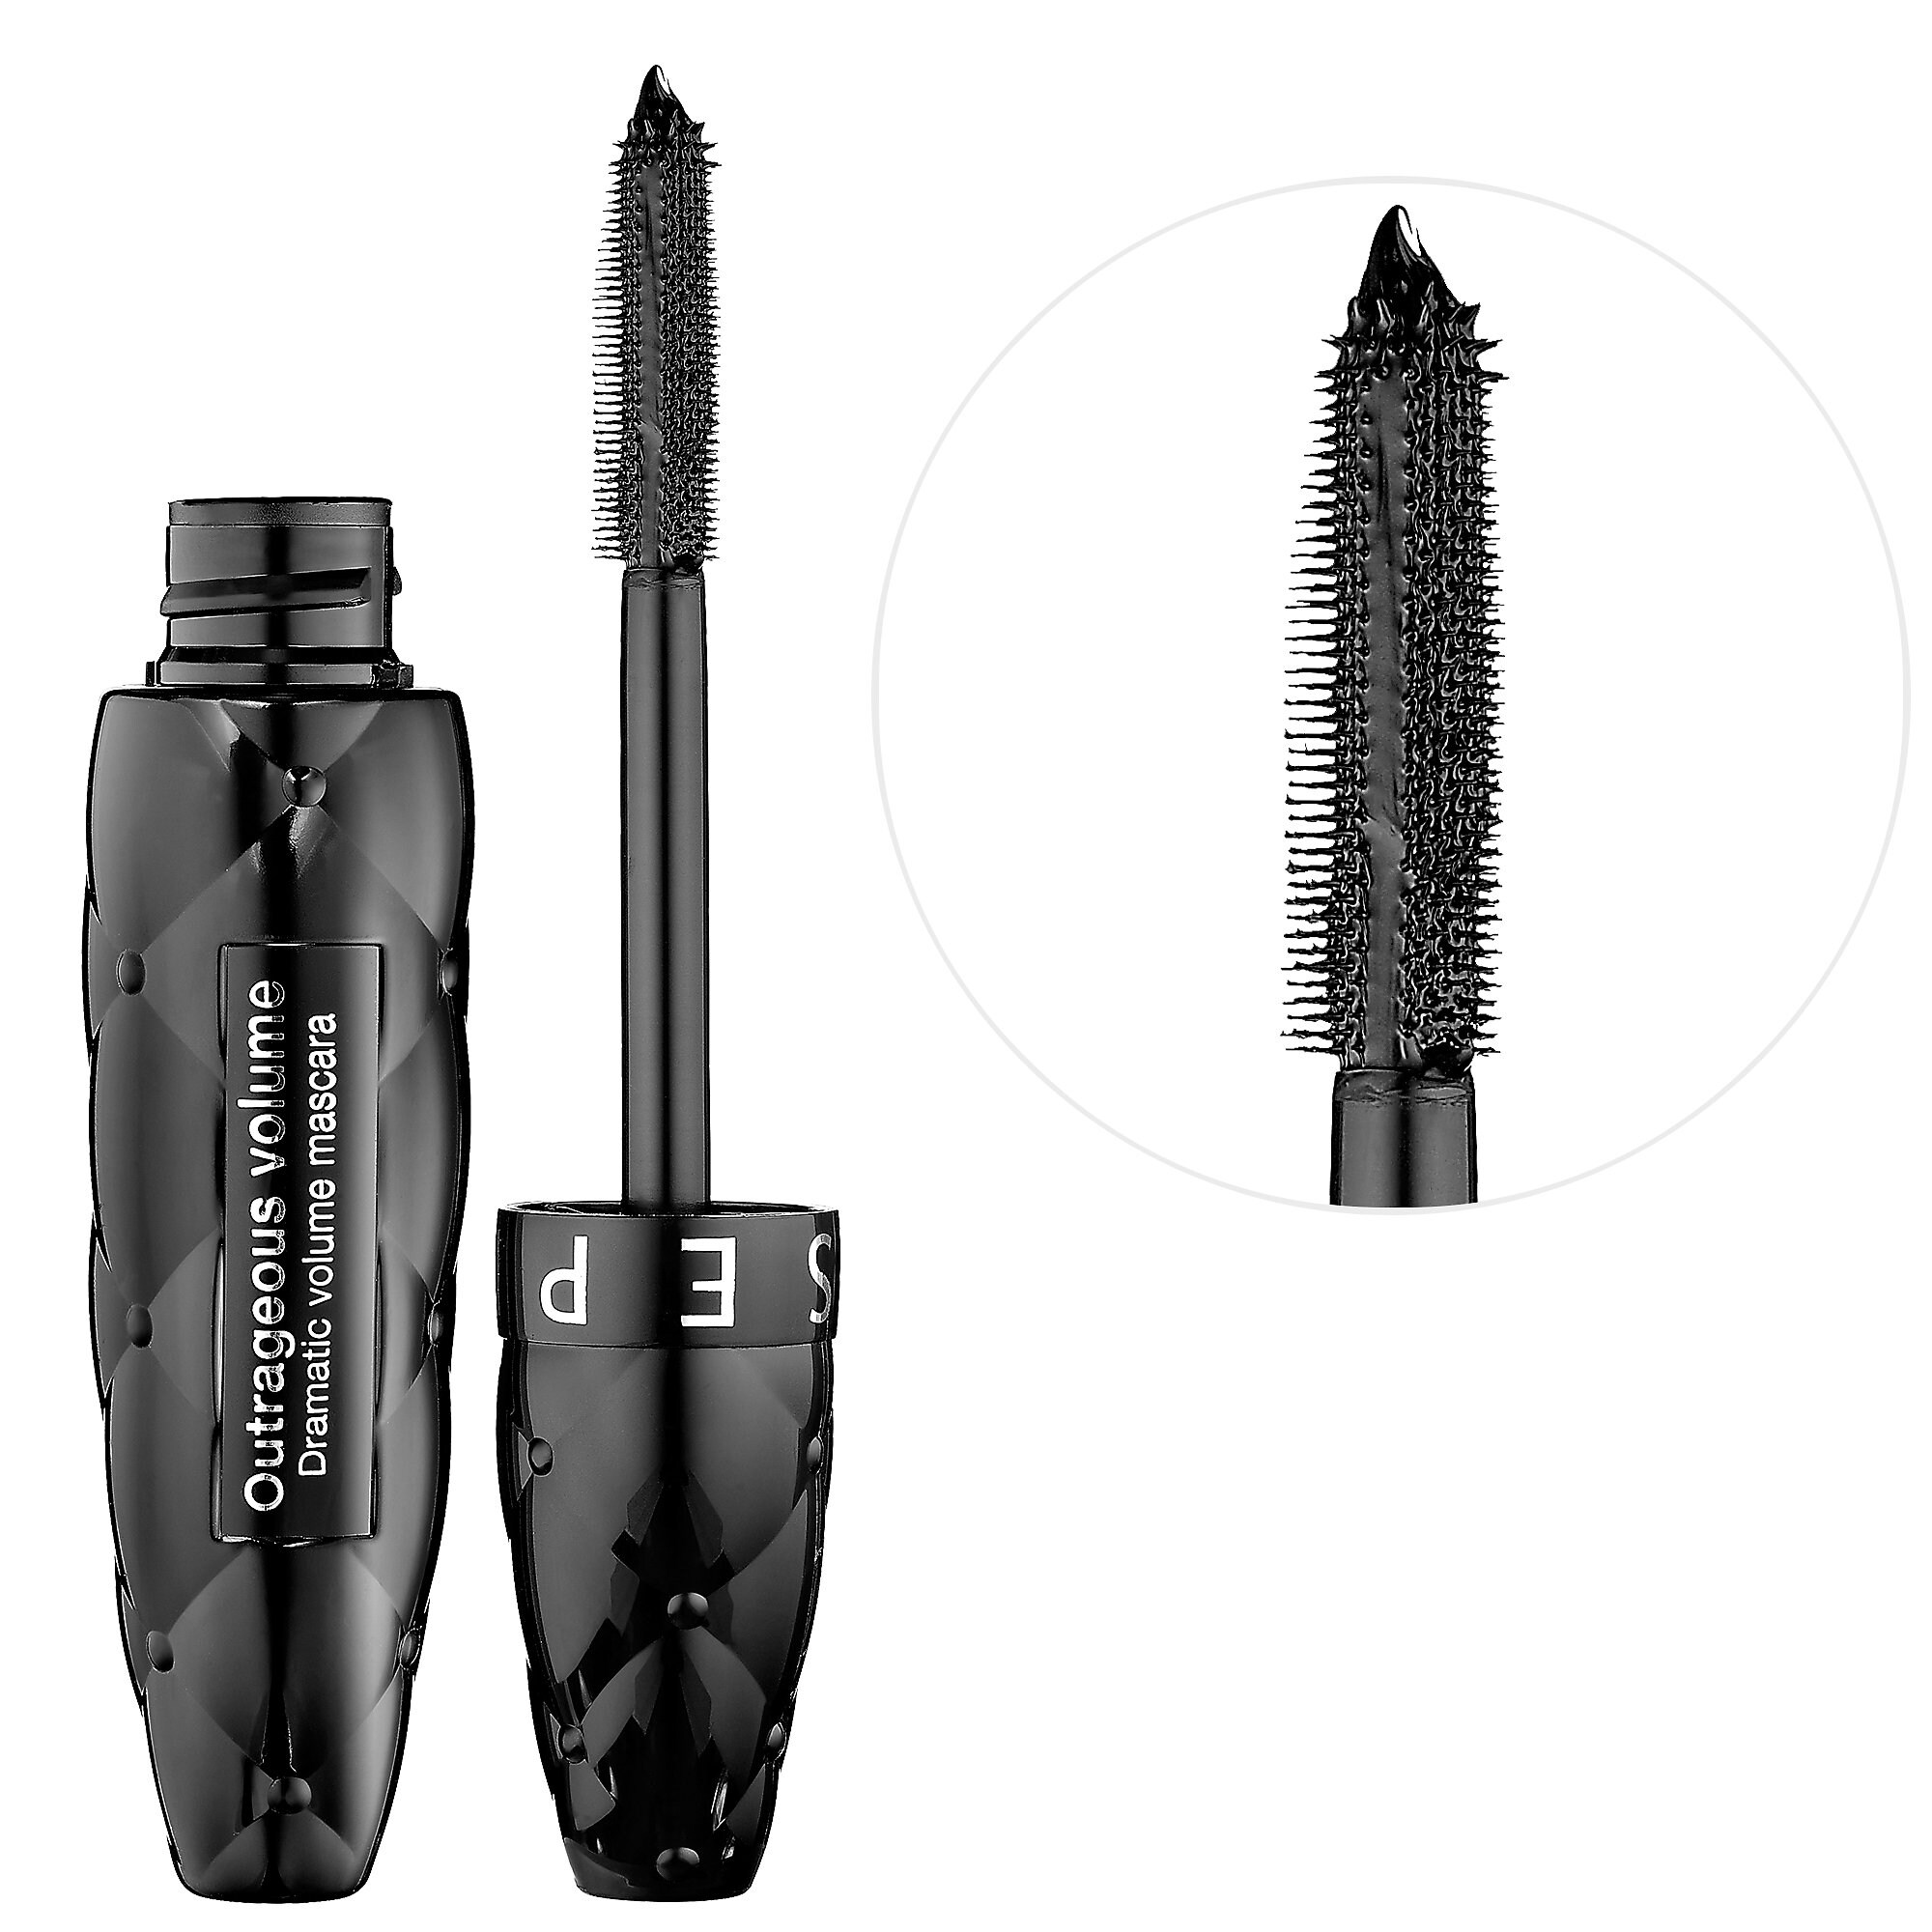
I'll be reviewing the Sephora Outrageous Volume brand product today, a reasonable beginning step into the confusing realm of the professional makeup world.

Pro's: Deepest black color I'd ever received in a mascara, high-drama, great length, a well-rounded product for the beginning makeup artist.
  Con's: Very thick potion, causes lashes to clump rather easily, becomes flaky after a few  hours of wear.

It's a bit of a trick to get this mascara not to clump, but it can be done, which is more than I could say for some of our drugstore counterparts. It just takes very little product and no more than one coat of the mascara. However, that is all you need of this product, the color is so rich and the product is so thick one layer is all you need. It's a great tool for people who are interested in starting into the
professional makeup scene. It was my first Sephora product and I'll always love it, even thought it was a little frustrating to apply. Not only was the volume spectacular, the length was wonderful as well. Always a 'love it' product, I highly recommend it, although it isn't the mascara I'm using currently (which I love even more than the mascara I'm talking about today, this mascara will have a separate review, where I'll be talking about mascara wands and the difference in lash potions separately). The product would transfer a little, but only if you pushed your lashes up into your lid, so that really wasn't an issue.
Over all I love this product and I recommend it to everyone who is willing to spend a little more time on their makeup daily, just to make sure it's applied correctly.

Total stars out of 5:  *   *   *   *


That's my product review for you this week! Next week I'll talk about tips and tricks to help your mascaras last longer, and helpful hints on how to apply it like a pro, with no clumps and perfectly lush lashes every time!
Until next week.

                   God Bless,