"Give a girl the right shoes, and she can conquer the world."
-Marilyn Monroe
Showing posts with label mascara. Show all posts

Tuesday, December 15, 2015

Okay so it really has been a damn year since I did anything with this blog....
Sorry.
But I'll make it up to you, I have a couple of different nuggets of information that I've picked up from the last year that have changed my makeup life.
So I'll start with the tips first, and the products second.

Tip 1: Use a hair dryer to heat up your eyelash curler. Warning, do not heat it too much! you will burn your eyelid and that is no buenos okay? By heating the curler, it works exactly the way a curling iron would, and keeps your curl lifted all day.

Tip 2: Okay this one is harder to explain but give me a hot minute, you can strategically place your lashes before you curl them. So while your lashes are in the position shown in the photo below, you may take your finger and position the lashes which ever way you like, you can separate them if any seem to be sticking to eachother, you may create a beautiful fanned-out effect by moving them into different positions, whatever you want really. I can't get enough of this technique.


Tip 3: Place eyelash adhesive to your lashline, as well as on the lash band. I usually place the glue all over the band, and then on my lashline in a dotted line, one stroke on the inner corner towards the tear duct, one in the middle, and then one on the outer corner of my eye, I have never had to deal with a painfully annoying lifted lash since using this technique, even through dancing for 4 hours underneath bleary hot stage lights that used to decimate most of my makeup.

Tip 4: Use Milk of Magnesia as a face primer. Sounds gross right? Wrong. This is my holy grail face primer in the summer, I've never used anything that has kept so much oil at bay for so long, and it smooths out texture like large pores and acne scarring. It is the only primer I use when I'm performing as well. It's perfection.

Tip 5: This is a tip that I picked up from a YouTuber Nikkitutorials, If you have dryer skin, using the Nivea Men's Aftershave Balm as a primer is fantastic. I use this primer in the winter and it has truly converted me to using it for all my dry skinned clients.


Alrighty, now it's time for the products I've become attached to over this past year.
The Sephora Collection Perfection Mist Airbrush Foundation is my holy grail performance foundation. The reason I specify performance is because this foundation retails at about 28.00 USD and even though it comes with about 2.5 fl oz (whereas the standard foundation bottle comes with about 1 fl oz) it comes in a spray-can sort of packaging, and when sprayed it releases a crap ton of product so in all reality you only get about 3 to 4 full faces with one can. But it looks amazing in photos, lasts all damn day and is very resistant to oil, and because whenever my dance studio puts on a bigger show, I always do a lot of girls' makeup and full stage makeup takes a very long time to do, and my specific routine that I have developed is very complicated, but with this foundation I can spray it all over the face, buff it in with a flat-top face brush and move on to the next step, it saves me so much time I'd make love to it if I could. I will be uploading a video/detailed product list of my full 30 foot stage makeup routine when it comes time in the dance season for me to perform on a stage that large again.
Now for every day makeup, which I will also be uploading a detailed product list/video on, I usually wear a tinted moisturizer and the Tarte Amazonian Clay Full Coverage Airbrush Fouldation  , which I use like a finishing powder. Now contrary to the name, this powder is far from full coverage, it's a light to medium coverage for sure, but I'll tell you the thing that makes me love the powder and swear by it until I die... As this powder collects oil, it looks better and better like you wouldn't believe. Over the coarse of an hour or two your face has no trace of any texture and it's just flawless, luminous but  natural and effortless.
And now, my favorite mascara as of recently is the L'oreal Extra Volume Collagen Black Mascara. I don't know who sold their soul to make a formula this close to Jesus's eyelashes but whoever did it deserves a Nobel peace prize because holy fuck. It lengthens, it volumizes, it separates, it's only issue is that even with the hair dryer eyelash curler trick, the lashes still sag over time. But still, it's not a horrible ammount of sag, just a little bit, I still love it.

And that's it! That's the highlights of the makeup year. I'll probably make a post about the worst products I've stumbled upon over this year in the future.
Ta-Ta for now.


God bless.

Saturday, October 4, 2014

Full Fluttering Falsies

Now that we've covered the essentials of eye makeup, let's talk about something fun.
Indevidual false eyelashes
False eyelashes.
I know from personal experience that fake eyelashes can be pretty
intimidating, I started experimenting with them when I was pretty young. But I'm here to tell you it's not all that scary. Lets start with the basics.
There are two kinds of false lashes, individual false lashes and strip eyelashes, and today we're going to cover applying them both.

Individual lashes come in a packaging just like the photo given. They commonly come in three lengths, short, medium and long, all tied at the bottom in a little knot. before attaching the eyelashes to our lid, we need to apply the glue. Make sure to purchase lash adhesive, as anything else would be very harmful to your eyes and would likely be very obvious. Now, I place a dot of adhesive on the back of my hand, and place the knots of 5 or 6 individuals inside it, keep in mind that we aren't attempting to cover the entirety of our lashline in these babies, just about half so we get the full, flared out and fluffy look we're hoping to achieve. While the lashes are resting in your glue, wait about a minute for it to dry, sometimes I like to curl and coat my lashes lightly with one layer of mascara while this is happening, it will help to support the falsies more easily. Once the glue is tacky, take a pare of tweezers, pick up the first knot and start at the outermost corner of our top lashline, place the first knot very very closely to our natural lash line make sure there's no gap in between your real lashes and the fake ones.
Continue this technique until you've covered the desired area on both eyes. Coat lashes in 1/2 coats more of mascara, click here to go to a post of mine full of helpful mascara tricks you might find useful.
Voualla! Sexy, lush, full lashes made easy.

Now to tackle Strip Lashes.
Strip lashes are, I'd say, a little more difficult to apply, and far less natural looking than individuals. I like to use them for formal dances, or performing. There are lots of different styles of this particular kind of false lash, but they're usually described very well on the packaging so you know exactly the kind of look you're getting with the product you purchase, whether it be a more fanned out look, or a doe-eyed innocent round shape.
To apply this product, take a pair of tweezers, and extract the lash from the packaging. Then hold the lash up to your eye to measure it. If the outer corner of the strip extends farther than the outer corner of your eye, take a pair of nail clippers or scissors and cut it to fit. However, never cut from the inner corner, the lashes become finer and more thin at this part of the lash, to help it seem as if it's blending into your natural lashes, if you cut this part, it'll look rather funny. I also like to curl my lashes and coat them lightly in mascara before applying these lashes as well.
After measuring and cutting off the excess lash, apply the adhesive to the strip part of the product. Note that the adhesive for individual lashes and strip lashes are different. So look carefully at the glue you're purchasing and make sure you're getting the correct one.
Once the glue has become tacky, take your tweezers and gently place the strip as close to the base of your natural lashes as possible, starting from the outer corner moving inward, repeat for your second eye. Coat both eyes in 1 to 2 more layers of mascara, and you're all done!
One more piece of advice I'd like to offer is for you to look at the color of your eyelashes. If they appear to be a lighter sort of color, such as blonde or ginger, I would suggest you browse Amazon for a blonde, ginger, or light brown pair of lashes for your eyes, and to invest in a brown eyeliner and mascara as well. This will help to make you look as "put together" as possible, because when you put black mascara on blonde lashes, often times you'll have patches of bright blonde shining through, and it's not the most flattering look. Just some food for thought.

I hope this tutorial has got you exited about false eyelashes! I know they're one of my favorite eye makeup tools to use. Especially individuals, they just add that extra oomf  to any look you're sporting!
Next week I'll be starting on my face makeup series, we'll be talking about all kinds of foundation, skin types, contouring/highlighting, pretty much anything you could ask for! If you have any questions or products you'd like me to review, leave a comment below!
Ta Ta for now Lovelies!

      God Bless.

Saturday, August 30, 2014

Thou Shalt Not Whisk Your Eyelashes.


Last week we talked about some of the drugstore/high-end mascaras that (according to personal preference) yielded varying results, ones that I loved, and some that I hated. Today lets talk about caring for our mascara, how to apply it correctly, and keeping those ugly clumps away.

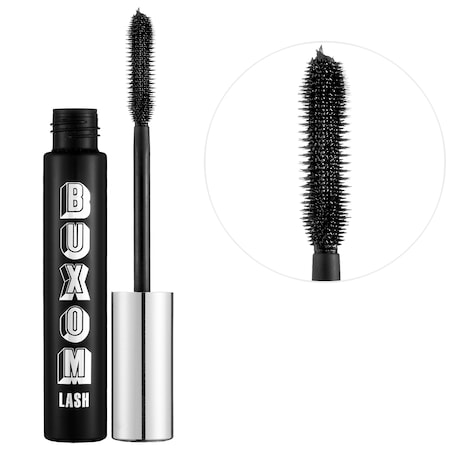
Firstly I'd like to talk about the product I'm using currently, I'd like you to take a good look at the wand and what the product looks like. As of right now I'm using my all time favorite mascara, the Buxom Lash. Lets take a look at the applicator. It's a rubberized brush, with long, well-separated bristles shaped in an hourglass figure. The hourglass shape is formed so that it's thicker on the end near the outer corner, and thicker towards the inner corner as well. Why? Because the thicker the brush, the more drama, so this applicator is going to bring big, pumped up diva-lashes strait to your little eye umbrellas. So why is it thicker towards the inner corner too? Isn't that just going to make our lashes look like they're doing the wave? No. Our lashes get thinner towards the inner corner, so this is actually going to give some continuity, keeping the drama going all the way into your friggen tear-duct. Also note what the actual mascara looks like. You can see that it's quite creamy, a very wet solution. it doesn't hug the bristles together, so this means that it's way less likely to clump. Here's a trick: whatever the wand looks like, for instance, if a wand has a lot of densely packed non-plastic bristles, with a thicker, more dry solution, this mascara aims for high drama, not focusing on length or separation, so most likely it'll clump if you don't apply it very carefully.

Now onto the tutorial section of this post.
This part is really important, because no matter how great of a product you find, if you apply it like you're trying to whisk the shit out of your eyelashes you're going to get goddamn clumps. So instead of pretending like your hand is a jackhammer and your lashes are  concrete, follow this quick guide to preventing clumps and making the most of your mascara!

Mascara rule #1: Curl your lashes. Now this is a pretty well-known rule, but it may not be as quick and easy as you think. When you're curling, you want to get as close to the roots of those babies as you can, do not pull the curler outwards, do not apply too much pressure. When we perform this step, we want to think of our lashes curling, not bending.
Mascara rule #2: Clean your wand. Before applying product to your lashes, you always want to make sure the tip of your wand is clean, as well as the rest of it. Some people deposit the excess product collected on the tip onto their hand, to later wash it off, others swipe the tip across the opening of the mascara tube. It doesn't really matter, just make sure it's clean. As for the rest of the brush, you can wipe it down on a makeup remover wipe, or a paper towel that won't leave behind any lint, just to make sure you don't have excess product on the applicator. Make sure you clean it every time you go for another coat, this prevents clumping, and keeps your mascara more fresh for longer.

Mascara rule #3: Apply it correctly. Often times when I watch others apply their mascara I see them making the biggest mistake they could possibly make, they apply it furiously. One swipe right after another with harsh wiggling, never giving the mascara time to set itself, as if they're trying to WHISK their eyelashes. You are always going to get clumps by using this technique. Stop. The most successful technique I've found (which is one my mother taught me not too long ago), is to use ONE pump of mascara for both eyes (get the wand as close to the roots of your lashes as possible), turn the wand SLOWLY, and either blink or pull the brush upwards. Wait about a minute, or two minutes, for your mascara to set, and repeat the application process, dipping the wand once for each coat. Don't apply too many coats, every mascara will clump and become bulky and flaky when you put 7 layers on, but a good mascara should be reasonably separated and dramatic at 4. Don't forget to clean your wand before placing it back in your tube after you're finished. If you see that your mascara has begun to dry out prematurely, try placing one or two drops of eyedrops (such as Visine) into the container and mix it in with your wand. Do not, however, pump your mascara to mix the drops in to it. This will push more air into your mascara and cause it to dry out faster, instead twirl your brush around, stir it a little, and you should be good!

And alternative way to apply mascara can be seen in this video here.
This technique will take you quite a bit more time to apply, but believe me it's worth it. Go check out this guy's channel, he is completely amazing! Truly a god of makeup art.
And I leave you with this! I hope this helped you with your makeup woes. Next week I'll do a fun, easy nail art tutorial just to take a break from the eye-related redundancy, which from there I'll start talking about makeup for your eye shape such as shadows, eyeliner, and more. I'll probably do one post for each eye shape, just to get more in depth so I don't leave anyone out!


Until next time,
     God bless.

Tuesday, August 26, 2014

Maybe She's Born With It, Maybe It's Not A Shitty Mascara.

Today I'm going to be reviewing a few of the drugstore mascaras that I've tried, giving reviews on my experience with them. Keep in mind this is my experience, and these mascaras could work differently for you depending on the type of lashes you have. You should also know my biases toward mascaras lean highly toward the quality of color and how well it separates. That's really what I look for in a mascara so naturally I'll give those products a better review.
I'll be reviewing three drugstore mascaras and one high-end mascara to show you the differences and what to look out for.
Let's go!


The first mascara I'd like to cover is Maybelline's The Rocket Volum' Express.

Pro's: Smooth application, I purchased the waterproof version of this mascara and it did resist the water very well.
Con's: Clumped badly, didn't volumize well, very flaky.

I purchased that mascara in a dark brown shade, 
just to accentuate my eyecolor. By the first application I already disliked it, It did not give my lashes any volume, instead I found it clumped no matter how hard I tried, or how little product I used. After about a month or two it had already dried out. Removing this mascara was a chore, I had to wait until I showered the next morning and use two different makeup removers to get it to come off. However this is a problem you face with almost every water-resistant mascara is that it...well... resists water.
 Overall stars out of 5:  *  


The next mascara I'd like to discuss is the Revlon Lash Potion Grow Luscious Volume and Length mascara.

Pro's: Beautiful dark brown color, applies quickly, provides fair volume.
                 Con's: Transfers onto your lid, takes a very long time to dry, clumping isn't a huge problem with this mascara however it's still an obstacle.

After purchasing the Rocket mascara I found the Revlon Lash Potion. I was quick to enjoy this mascara, it had a wonderful color, and didn't clump on the first coat. It didn't quite give me as much drama as I was hoping for, but it was still a good every-day mascara. I purchased this product in Blackened-Brown, coupled with a darker brown gel eyeliner it looked great. There isn't much more to say about this other than it's a good standby mascara when you need something quick and not-too-dramatic. Would I repurchase it? Probably not, it was just a bit run-of-the-mill for my taste.
Stars out of 5:  *  *  *


Let's talk about falsies now. We've all heard of these mascaras, some beauty gurus swear by them. I however, have had a different experience.
I've tried a lot of this brand of mascara, but I'm going to talk about The Falsies Winged mascara today.

Pro's: Rich dark black color, potion was not too thick or dry, lasted for months.
           Con's: Did not wing lashes as advertised, transfers badly, clumps, hard to apply.

This mascara was indeed high-drama, that can either be a good thing or a bad thing depending on how it was applied. It was a very picky mixture, and with the slightly confusing curved wand, it was an adventure to figure out how to use. Once you solve the puzzle however it's a fairly decent product. I was not too overly impressed as when you would apply over one coat it would become overly shiny, as if it was too oily. I don't think I'll be purchasing this again, but if you're feeling brave go ahead and try it for yourself and tell me how it worked for you!


Stars out of 5:  *  *


Now for our high-end mascara.
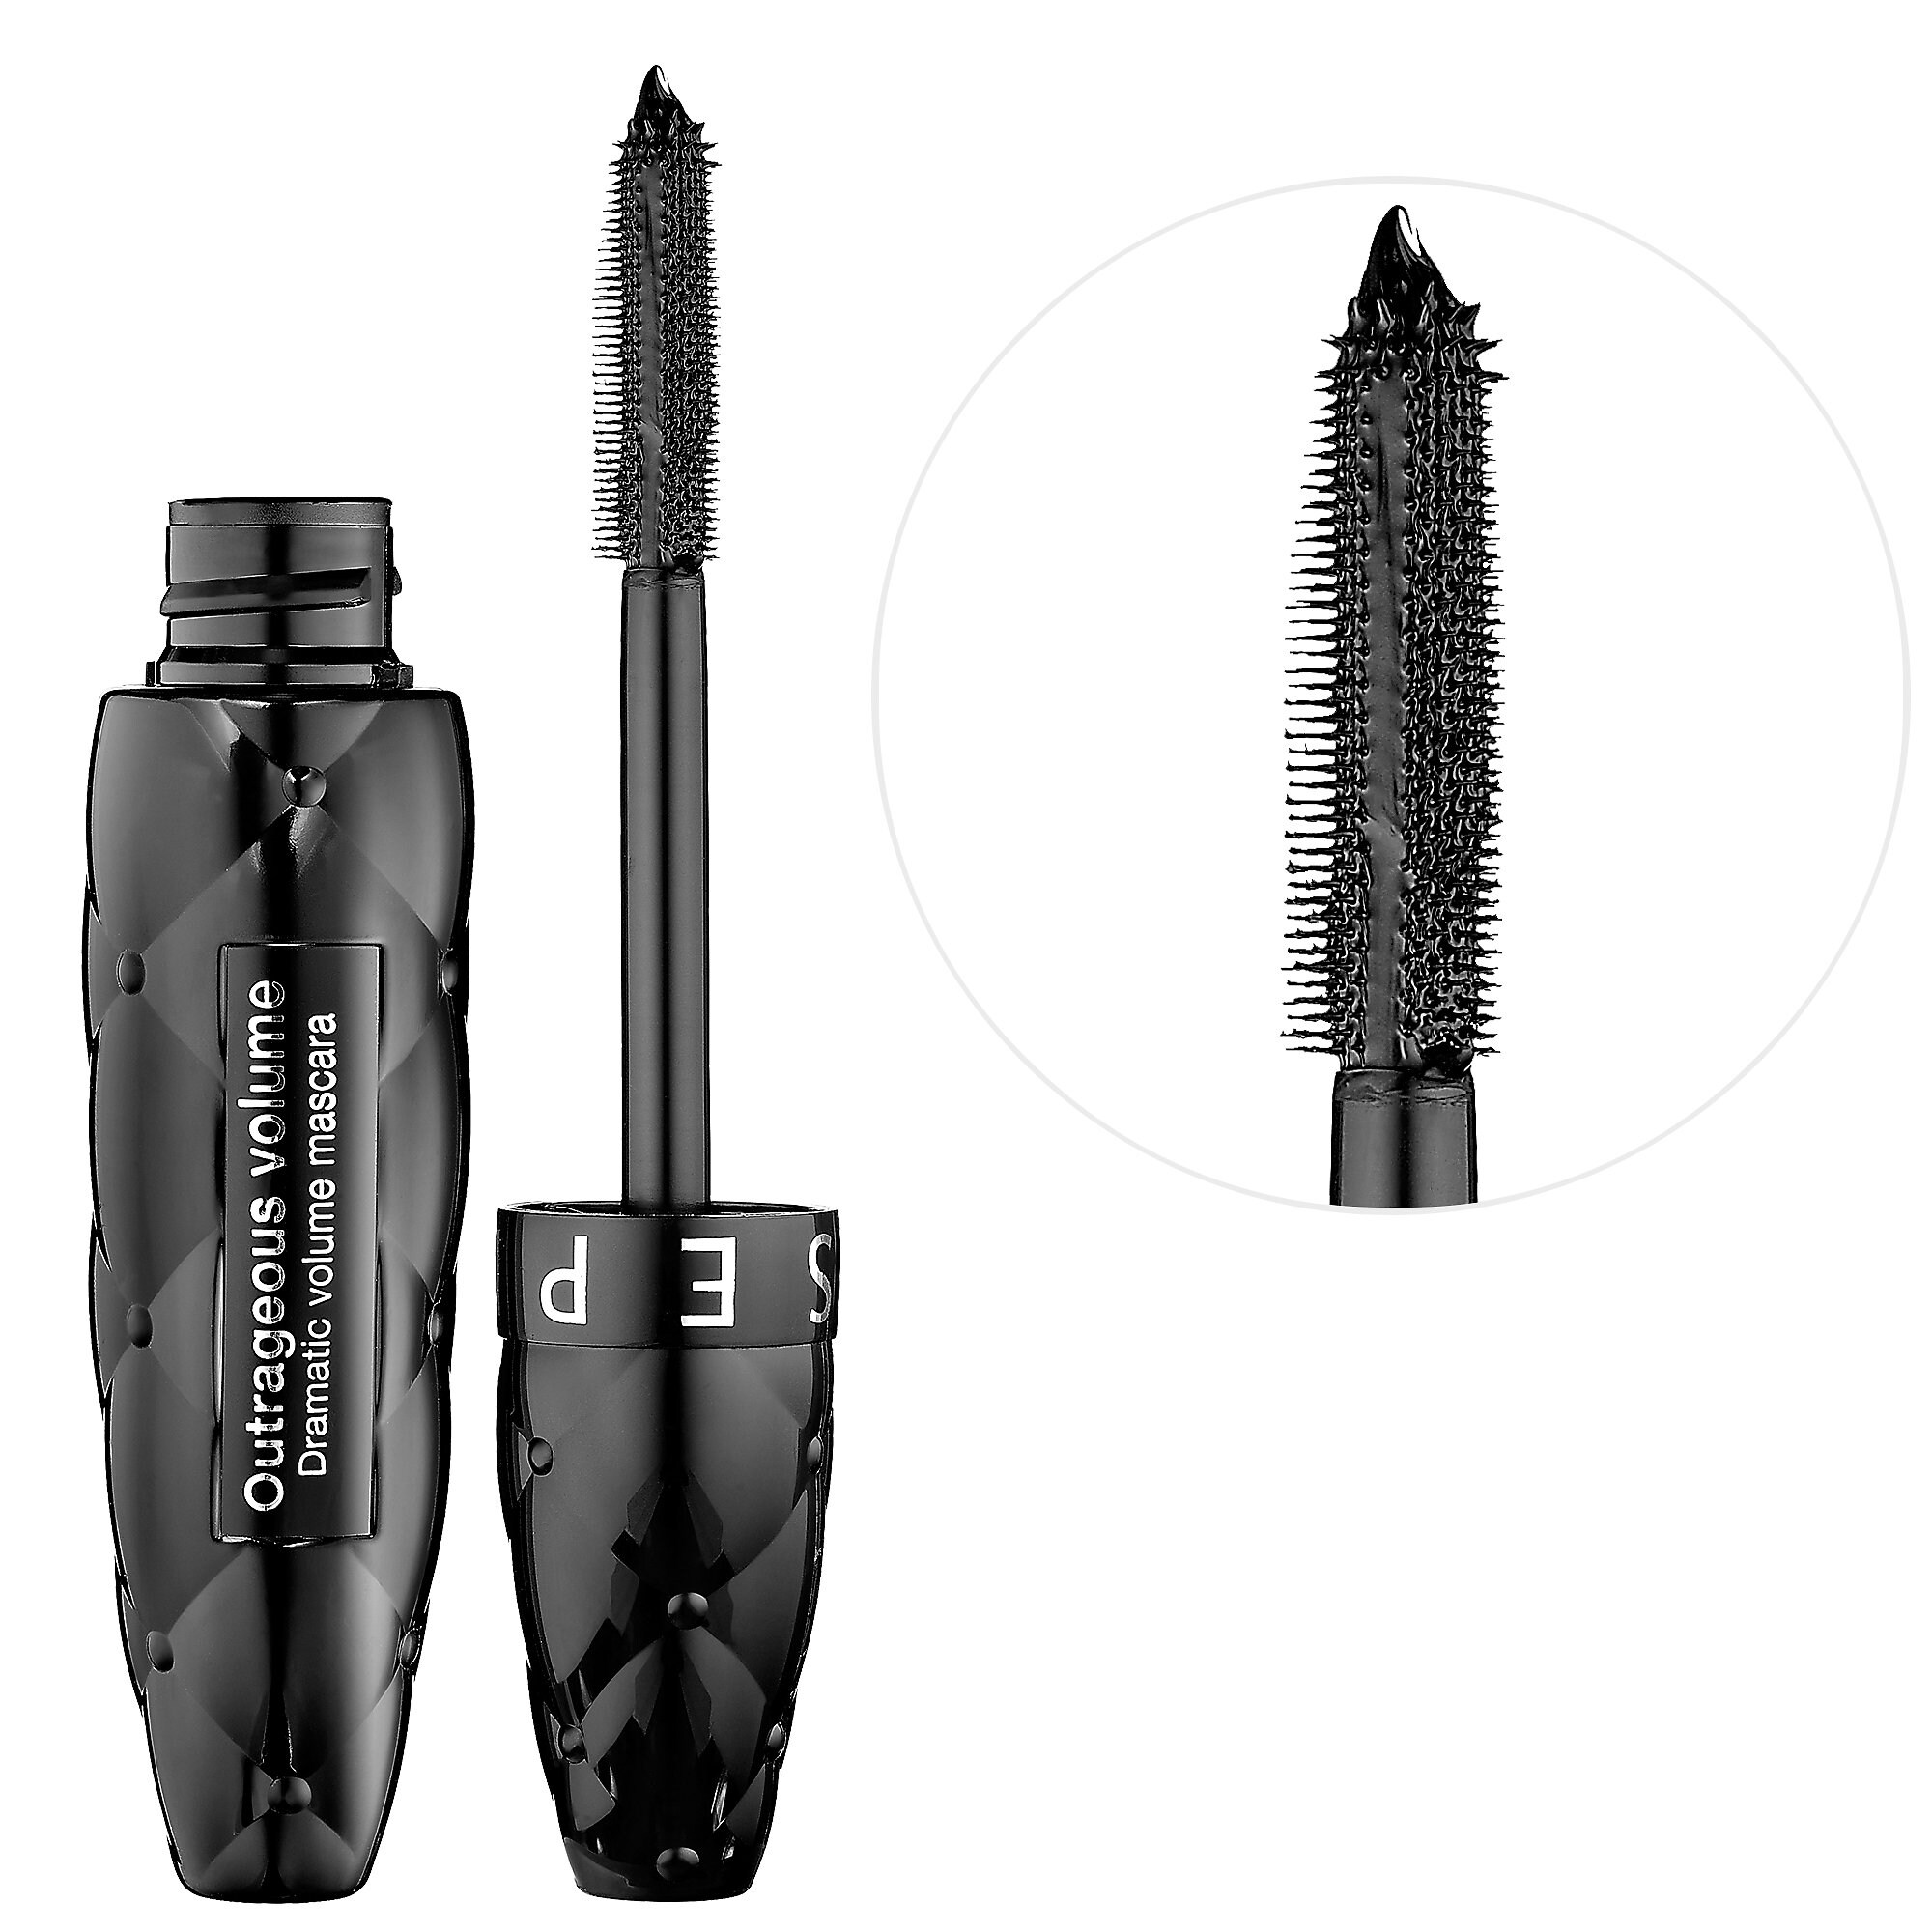
I'll be reviewing the Sephora Outrageous Volume brand product today, a reasonable beginning step into the confusing realm of the professional makeup world.

Pro's: Deepest black color I'd ever received in a mascara, high-drama, great length, a well-rounded product for the beginning makeup artist.
  Con's: Very thick potion, causes lashes to clump rather easily, becomes flaky after a few  hours of wear.

It's a bit of a trick to get this mascara not to clump, but it can be done, which is more than I could say for some of our drugstore counterparts. It just takes very little product and no more than one coat of the mascara. However, that is all you need of this product, the color is so rich and the product is so thick one layer is all you need. It's a great tool for people who are interested in starting into the
professional makeup scene. It was my first Sephora product and I'll always love it, even thought it was a little frustrating to apply. Not only was the volume spectacular, the length was wonderful as well. Always a 'love it' product, I highly recommend it, although it isn't the mascara I'm using currently (which I love even more than the mascara I'm talking about today, this mascara will have a separate review, where I'll be talking about mascara wands and the difference in lash potions separately). The product would transfer a little, but only if you pushed your lashes up into your lid, so that really wasn't an issue.
Over all I love this product and I recommend it to everyone who is willing to spend a little more time on their makeup daily, just to make sure it's applied correctly.

Total stars out of 5:  *   *   *   *


That's my product review for you this week! Next week I'll talk about tips and tricks to help your mascaras last longer, and helpful hints on how to apply it like a pro, with no clumps and perfectly lush lashes every time!
Until next week.

                   God Bless,